Homebrew
Install Homebrew
Developers use the Homebrew utility to install various Unix software packages. If you haven't already installed Xcode Command Line Tools, Homebrew will install it.
Tip: If you did not use a password to log in to your Mac (that is, if your password is blank), you cannot install Homebrew.
I use a password! Who doesn't!?
These instructions are for a terminal running Zsh, the Z shell, on a newer Mac. Older Macs may be running the bash shell and you should upgrade.
I have Zsh. Glad that my Mid-2014 MacBook Pro (Intel)|2014年版MacBook Pro is considered "new"!
Check if Homebrew is installed:
$ brew
Homebrew is not installed if you see:
zsh: command not found: brew
If Homebrew is not installed, there should be no Homebrew files in /usr/local (for macOS Intel) or /opt/homebrew (for Apple Silicon).
Homebrew provides an installation script you can download and run with a single command (check that it hasn't changed at the Homebrew site).
I followed this single-command approach. It works (using Bash shell), but it also proceeded to install Xcode again, which I already had. I hope this won't cause trouble.
This is the easiest way to install Homebrew. If you want a harder way, you can download the installation script from GitHub and run it locally as separate steps.
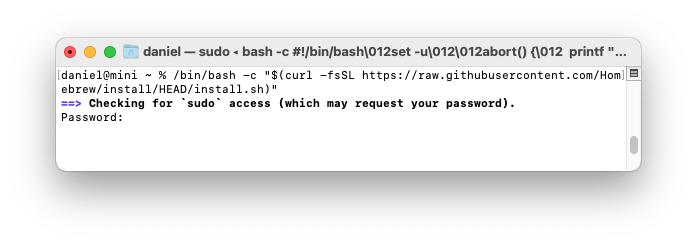
$ /bin/bash -c "$(curl -fsSL https://raw.githubusercontent.com/Homebrew/install/HEAD/install.sh)"
The Homebrew installation script will ask you to enter your Mac user password. This is the password you used to sign into your Mac.
Password:
You won't see the characters as you type. Press enter when you are done.
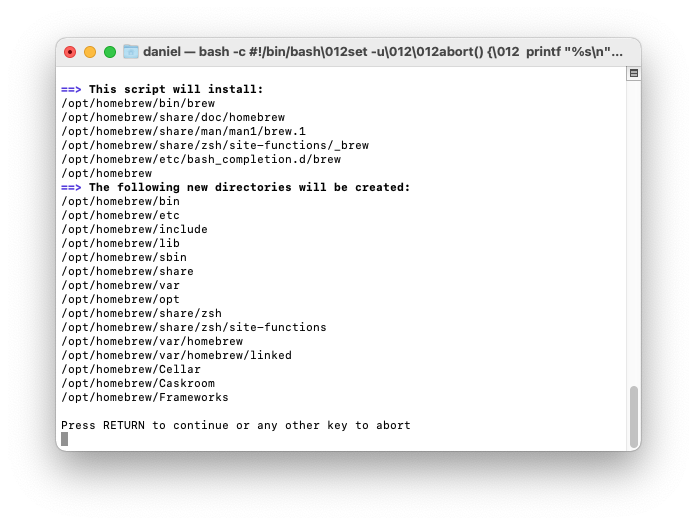
You'll see a list of files and folders that Homebrew will install. If you haven't already installed XCode CommandLine Tools, you'll see a message that "The XCode Command Line Tools will be installed." Press return to continue when prompted by the Homebrew installation script. It takes five to ten minutes to download and install the Command Line Tools.
Homebrew installation takes many minutes (you’ll see diagnostic and progress messages).
On Mac Intel machines, that's all you need to do; Homebrew is ready to use. On Mac Intel, Homebrew installs itself into the /usr/local/bin directory, which is already configured for access by the shell with the macOS default $PATH environment variable (the default is set by the /usr/libexec/path_helper command).
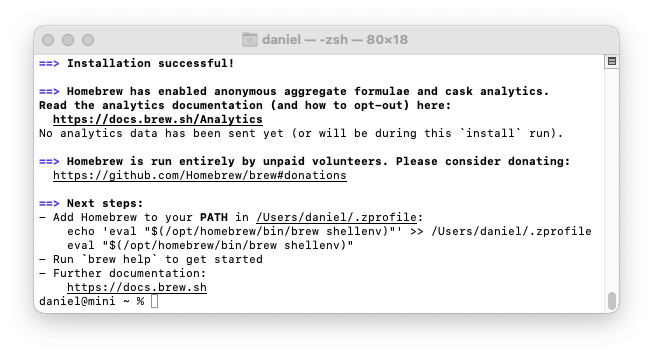
On Apple Silicon machines, there's one more step. Homebrew files are installed into the /opt/homebrew folder. But the folder is not part of the default $PATH. Follow Homebrew's advice and create a ~/.zprofile file which contains a command which sets up Homebrew. Homebrew shows instructions at the end of the installation process:
**==>** **Next steps:**

- Run these two commands in your terminal to add Homebrew to your **PATH**:

    (echo; echo 'eval "$(/usr/local/bin/brew shellenv)"') >> /Users/ekliao/.zprofile

    eval "$(/usr/local/bin/brew shellenv)"
Copy and paste from the Homebrew instructions because they include your own user directory name. Execute the two commands exactly as shown above. It worked.
After you've installed Homebrew, check that Homebrew is installed properly.
$ brew doctor
You should see:
Your system is ready to brew.
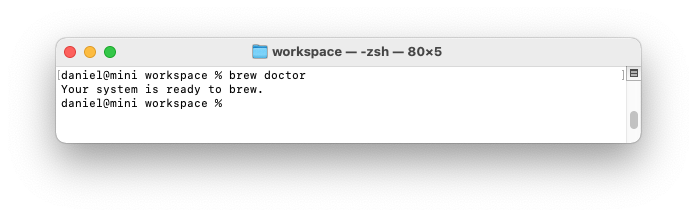
This is the result for me. Worked out in the end!
ekliao@ELI-1T-Side-MBP14 ~ % brew doctor

**Please note that these warnings are just used to help the Homebrew maintainers**

**with debugging if you file an issue. If everything you use Homebrew for is**

**working fine: please don't worry or file an issue; just ignore this. Thanks!**

Warning: Broken symlinks were found. Remove them with `brew cleanup`:

  /usr/local/bin/paxctl

ekliao@ELI-1T-Side-MBP14 ~ % brew cleanup

Pruned 1 symbolic links from /usr/local

ekliao@ELI-1T-Side-MBP14 ~ % brew doctor

Your system is ready to brew.
On Apple Silicon, if you see zsh: command not found: brew, check that you've created a ~/.zprofile file as described above and restarted your terminal application.
If Homebrew is successfully installed, there will be Homebrew files in /usr/local (for macOS Intel) or /opt/homebrew (for Apple Silicon).
As you use Homebrew, it is helpful to see a list of all the packages you've installed, or packages and dependencies.
$ brew list
$ brew deps --tree --installed
Right now, immediately after installation, these commands show nothing is installed. Same for me.
Next we'll configure Git, an essential tool for any developer. But first, be aware that you may have to reinstall Command Line Tools after a macOS upgrade.
After a macOS Upgrade
After a macOS upgrade (for example, from macOS 11.2.2 to 11.2.3), the upgrade process may remove the Command Line Tools. This can be annoying if you install an upgrade and then find you can't use commands such as git. You may encounter an error like:
xcrun: error: invalid active developer path (/Library/Developer/CommandLineTools),
missing xcrun at: /Library/Developer/CommandLineTools/usr/bin/xcrun
Checking for the Command Line Tools folder may show that the folder is there:
$ xcode-select -p
/Library/Developer/CommandLineTools
But look closely and the Command Line Tools folder may be missing essential folders and files after a macOS upgrade. It should look like this:
$ ls -l /Library/Developer/CommandLineTools
total 0
drwxr-xr-x  5 root  wheel  160 Jan  9 07:43 Library
drwxr-xr-x  5 root  wheel  160 Apr 24 16:19 SDKs
drwxr-xr-x  7 root  wheel  224 Apr 24 16:19 usr
Same for me. Yay! It may look like this after an upgrade:
$ ls -l /Library/Developer/CommandLineTools
total 0
drwxr-xr-x  7 root  wheel  224 Apr 24 16:19 usr
Homebrew is installed but brew doctor will show problems:
% brew doctor

Warning: Git could not be found in your PATH.
Homebrew uses Git for several internal functions, and some formulae use Git
checkouts instead of stable tarballs. You may want to install Git:
  brew install git

Warning: No developer tools installed.
Install the Command Line Tools:
  xcode-select --install
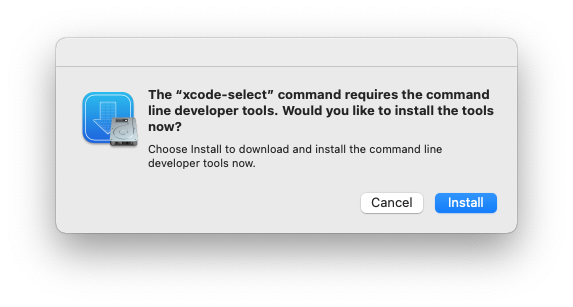
You've already installed Homebrew and allowed Homebrew to install Xcode Command Line Tools. Now you must re-install Xcode Command Line Tools from the command line:
$ xcode-select --install
A message will pop up on the screen. Confirm that you want to install the tools.
You'll see a progress indicator as the software downloads.
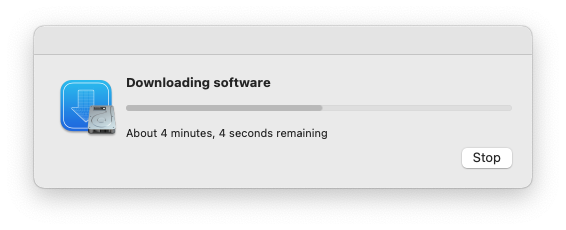
Finally you'll see a confirmation that the software was installed.
Verify that you've successfully installed Xcode Command Line Tools.
$ xcode-select -p
/Library/Developer/CommandLineTools
Check that you can run git:
git --version
git version 2.30.1 (Apple Git-130)
Yes I can! You've seen how to reinstall Command Line Tools after a macOS upgrade.
Next, if you haven't already done so, we'll configure Git, an essential tool for any developer.
Next: Git